Water Water everywhere …

One of the basic requirements to sustain human life is water. When you’re at sea, especially on long passages, drinking water becomes a valuable and scarce commodity.

water bladders
Water bladders on Pamela C

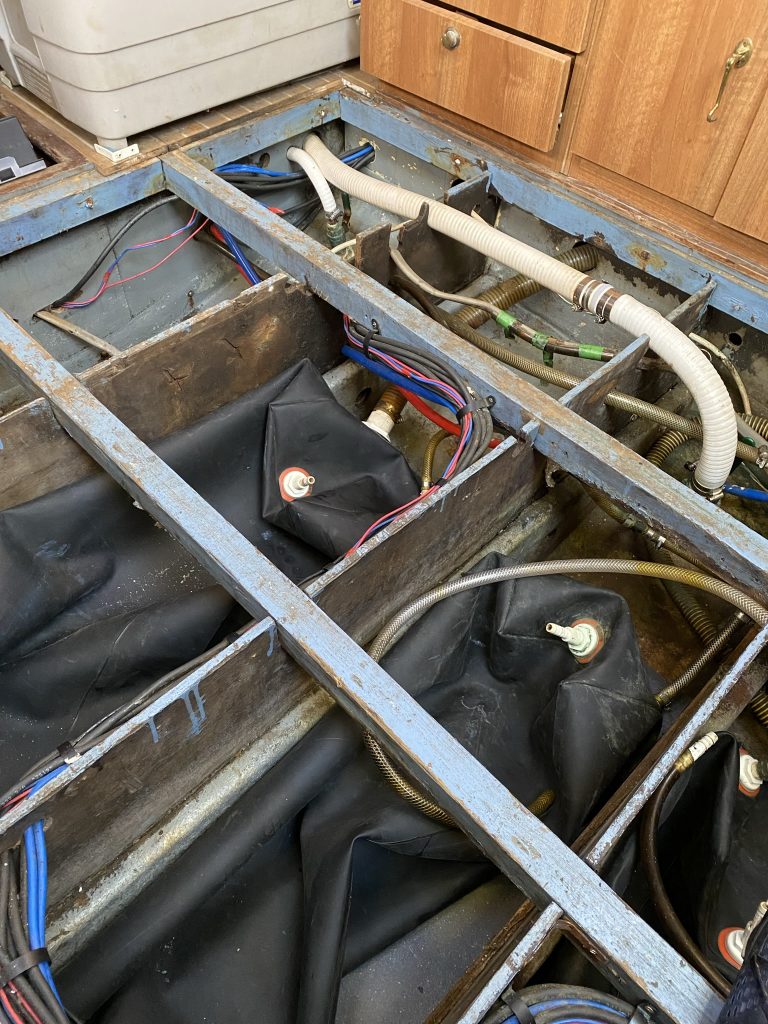
Pamela C has 3 bladders that will hold a total of roughly 450-500 litres of water. The average person should drink at least 3-4 litres of water a day, potentially more in hot weather or if you are exerting yourself, so on the surface, you’d think that would be enough for weeks.

This however is nothing, according to WaterWise the average person uses upwards of 140 litres of water PER DAY in the UK! Obviously, this isn’t sustainable on a boat when you have such limited quantities of water available, especially on passage when you might be away from shore for 3 weeks or more at a time.

When on passage, certain things have to give. You can’t shower every day. Washing up might have to wait, or you use salt water wash and then sparingly use fresh water for that final rinse.

Considering the amount of water around you (roughly 332,519,000 cubic miles of sea water!) it’s a shame that drinking it will eventually kill you. If only there was a way to turn the seawater into drinking water I hear you say? Well, funnily enough, there is – and there are a few options.

You can set up funnels to catch rainwater and dump it into your onboard water tanks. Great, but you risk also getting some seawater and who knows what pollutants are in the rainwater (acid rain anyone?). You can build a still to boil off the water and catch the condensation/steam and turn that back into pure water. If you’re shipwrecked on a desert island then both of these tricks are definitely something you would be doing.

Water Makers

On a boat, however, there is another option. You can install a “water maker”. These work by using reverse osmosis and forcing seawater through a set of filters, initially under pressure, which results in freshwater being produced and a by-product of brine. The freshwater can then be stored in the ships water tanks, and you have an almost infinite supply of fresh drinking water that you can generate at rates of between 25 litres and 80 litres per hour, depending on the water maker you’re using. This however comes at a cost. The cheapest I have found so far comes in at roughly £3,500 with prices increasing to over £10,000 at the 80 lph levels.

They also seem to come in two flavours, either modular (naked) or as a complete unit. On a boat, space is very much at a premium and the modular options seem to make more sense as you can install the components in various spaces around the boat.

How Do They Work?

Most marine watermakers use a process known as reverse osmosis to extract fresh water from brine. Basically, it involves putting the seawater under pressure (some 800 – 900psi) over a semi-permeable coiled membrane. Freshwater then migrates through the membrane and is collected, leaving a more concentrated brine solution behind.

They can be powered from 12/24/48 volt DC, AC and/or a generator. For my needs onboard, 12 volt is abundant and as such I will be primarily looking at the 12-volt solutions.

The Options

So far, after a fair bit of research, I have identified the following options based on a 12-volt system.

ManufacturerGPH/LPHCosts
Rainman30 LPH$5,000 USD
ECH2O Tec50 LPH$6,000 USD
ECH2O Tec120 LPH$8,000 USD
ECO Sistems Splash 30S30 LPH£ 5,279 GBP
ECO Sistems Water Pro60 LPH£ 7,862GBP
Blue Gold ECO+ DIY30 LPH€3,864 EUR
Blue Gold ECO+ DIY60 LPH €4,641 EUR
Seawater Pro65 LPH$3,795 USD
Prices ex VAT and shipping

Pros and Cons

One of the problems with a water maker is that if you’re not using it on a regular basis (at least twice a week) then you need to “pickle” the membranes to preserve them. This means lots of additional maintenance and potential additional costs. As such the general advice is not to install a watermaker if you intend to spend a lot of time in marinas.

You need to replace the membranes on a semi-regular basis and (apparently) might need different sorts of membrane kits depending on the water/ocean you’re in?

A pack of 5 replacement filters for the Seawater Pro is only $39 USD however, so this at least doesn’t seem too expensive, depending on how often they need to be changed of course. You can also get a UV sterilizer for $95 that is compatible with the SeaWater Pro watermaker which looks like a useful addition.

Conclusion

At this stage, I’m not sure which one I will end up buying. I think the top 2 on my list are the Rainman and the SeaWater Pro. The more I look at the options, the more I think I’m inclined to go with the SeaWaterPro – it just depends on whether or not I can get one into the UK without excessive additional import costs.

Space … the final frontier … or is it?!

So, over the last year, I have been working more and more on video editing and producing 4K content as part of my in depth exploration of my childhood dream to become a film maker (insert mid life crisis jokes here!) 🙂


One of the biggest problems I’ve had to date has been storage space, finding enough space to keep all the video I have been creating, the B-Roll, the content libraries and more.

Having bought a Promise2 R8 Raid array with 8 x 3TB drives and Thunderbolt 2, this quest for storage has been satiated for quite some time, however as the 18TB (usable) space is being eaten up rapidly (now I am filming in 4K and 6K ProRes RAW) and I am creating more and more content on an almost daily basis, I needed something bigger …. and FASTER.


Promise2 RAID via Thunderbolt 2


A new problem has arisen, one which I had previously not anticipated, and that is that I need storage which is also fast enough to be able to edit 4K/6K footage on.  The project files are generally too large to work on my local 1TB m.2 SSD in the iBin (Mac Pro Late 2013) as that only ever seems to have 200GB-300GB of space free, and that can be the size of the cache for a single project these days.  The Promise RAID solution has been good, but I’m only really seeing 180MB/sec out of the array, which is proving not to be enough as I start to render complex projects with multiple layers and effects.  I’m also sometimes working on two computers simultaneously (my MacBook Pro 2017 with discrete GPU is now faster than my desktop, so sometimes I move to work on this) … I have been syncing the project file between the Promise RAID and an m.2 SSD drive, which is giving me nearly 500Mb/sec over USB-C to the MacBook … but it is only 1TB … so only really good enough for a single project at a time, and I don’t have access to the library of B-Roll I’m building … so I need to copy that from the library, which means duplicate files everywhere eating more disk space.

m.2 SSD Internal drive


In my dayjob we’ve been using 10GB networks and wide area storage arrays (ceph) for years.  They’re fast, efficient, infinitely scalable and relatively “cheap” compared to other SAN solutions on the market … we have 200TB+ of storage and we can grow that daily just by adding more drives / chassis into the network.  This however is overkill for a domestic / SoHo solution (with 80+ drives and 20 servers and counting, this is definitely a “carrier grade” solution!


So I thought it was now time to merge my expertise in Enterprise storage and networking with my hobby and need for something which is “better” all round.


Historically, the secret to faster storage has always been “more spindles“.  The more disks you have in your array, the faster the data access is.  This is still true, to a degree, but you’re still going to hit bottle necks with the storage, namely the 6GB/sec (now 12GB/sec) speeds of the SATA/SAS interface, 7200RPM speeds of the disks (yes you can get 15K RPM drives, but they’re either ludicrously expensive, or small, or both).  


SSDs were always a “nice” option, but they were small and still suffered from the 6GB/sec bottle neck of the SATA interface.  Add to that reliability issues of MLC storage and the costs of SLC storage (article: SLC vs MLC) which made NAND flash storage devices impractical.  I have had many SSDs fail, some after just a few days of use, some after many months.  Spending $500 on something which might only last you 2 weeks is not good business sense).


Today, we have a new generation of V-NAND and NVMe hybrid flash drives which have up to seven (7) times the speed and much higher levels of reliability that interface directly to the PCIe interface and bypass previous bottle necks like the SAS/SATA interface.  And they’re (relatively) affordable and come in much larger capacities (up to 2TB at the time of writing, although I’m told “petabyte” sizes are just around the corner).

So, the question now is how do I put all of this knowledge together to deliver a faster overall solution?


From the networking perspective, I started off looking at 10 Gig capable switches.  I found a few options on eBay including 24 port Juniper EX2500 switches for £600 each (now end of life, but they’ll do the job) however I ended up choosing a brand new Ubiquiti EdgeSwitch 16-XG for £450, which has a mix of 10GBase-T and 10G Base-X interfaces (SFP+ and RJ45) so that I could connect a mix of devices regardless of whether they were via copper or fibre.


Ubiquiti Edge Switch 16 XG


For the MacBook Pro, I bought a Sonnet Solo 10 Gig (Thunderbolt 3 interface) for £185, and for the MacPro (iBin) I bought a Sonnet Dual 10 Gig Thunderbolt 2 interface for £385.

Sonnet 10G Solo Thunderbolt 3


Connecting the devices together with CAT7 cables bought on Amazon for £15 and 10GTek Direct Attach cables to link the SFP+ devices (see below) to the switch.  In my dayjob we have been using Mellanox DirectAttach cables, however my UK suppliers seem have had a falling out with Mellanox as despite trying to buy supplies of these for work through both Hammer and Boston (both of whom have promised faithfully to always carry stock of essential items such as these) have been unable to supply any to me despite my attempts to order them repeatedly over the previous 6 months.  The 10Gtek ones work, and come in at about the same price … and ordering is a lot less painless than having to raise purchase orders and deal with wholesalers on the phone.  Plus, I wanted to try and do this using only items I could buy today as a “consumer”.


Next, I looked at off the shelf NAS solutions .. the two lead contenders in the space appear to be Synology and QNAP.  I placed orders for a number of different units, not all turned up, some are (still) on back order with the suppliers, and at least one supplier (Ingram Micro) cancelled my order and told me to re-apply for an account as they’d changed systems and I hadn’t ordered anything in their new system yet – despite having just ordered something in their new system .. Go figure! 🙁

My original plan had been to compare Thunderbolt 3 networked devices to 10 Gig networked devices, however as QNAP are the only manufacturer (currently) to have a TB3 equipped unit, and as Ingram failed to supply the device (and nowhere else had stock) I have yet to complete that test.

As far as drives go, despite their bad rep, we’ve had fairly positive results with Seagate drives at Fido, so I opted for a batch of the ST12000NE0007 IronWolf Pro 12TB drives at £340 each

The chassis ordered for testing 


Synology DS2415+ (10 Gig an optional expansion card)

Synology 1817 (10 Gig built in)

QNAP TS-932X (10 Gig built in)

QNAP TS-1282T3 (10 Gig built in and Thunderbolt 3)


On paper, the 1282 T3 looks like the winner (if only I could get hold of one!).  The TS-932X looks like it might be ok, but the CPU worries me.

The Synology 1817 has the same CPU as the TS-932X, QNAP has QTier as well as SSD caching


File hashes


A good way to verify if a transferred file has not been corrupted during transfer to another computer is to use MD5 hash. What you do, is calculate the digital signature of the file on both sides, then compare the output. If they are the same, you are OK, if not, you need to transfer the file again.

Mac OS X, does not come with md5sum installed by default, but it comes with an equivalent tool that you can use instead. md5. To calculate the 128 bit MD5 hash of a file, run this command:

md5 [file.ext]

If you need the same output format that md5sum has, use this.

md5 -r [file.ext]

openssl also has a function to calculate md5 hash.

openssl md5 [file.ext]

That is all. You can now be sure that file you transferred via, ftp, http, or any other way is the same in both sides of path.